GLofter Beta Testing Guide

1. Product overview
GLofter is a decentralized photography studio platform built on ArcBlock Blocklets.
- GLofter Studio Each photographer can run their own Studio Blocklet for portfolios, albums, services and bookings, themes and site settings, an admin area, and more—with a “work first, clear personal brand” feel.
- GLofter Hub The Hub aggregates multiple studios: discovery, join requests, on-chain delegation and related flows, and operator-side configuration. Together with Studio it forms the full ecosystem.
What you will use in testing:
- DID Wallet for sign-in (tied to on-chain identity and test tokens).
- Blocklet Server, installing and running GLofter Studio and GLofter Hub from the test Blocklet Store.
2. Before you start
2.1 Install DID Wallet (browser extension recommended)
DID Wallet is the decentralized identity wallet in the ArcBlock stack; you need it for test login and some on-chain steps.
Browser extension (recommended for this guide)
- Chrome / Chromium family (including recent Edge, Brave, etc.): install from the Chrome Web Store: https://chromewebstore.google.com/detail/did-wallet/ibjflpbmadchofnbpppegdbnifdgincp (Edge: In Extensions settings, allow extensions from other stores, then open the link above to install.)
Mobile apps
- Official site (all platforms): https://www.didwallet.io/
- iOS (App Store): https://apps.apple.com/app/did-wallet/id1460083542
- Android: Search “DID Wallet” on Google Play, or follow https://support.didwallet.io/howToDownload.
If the page asks you to scan a code or open the app, follow the on-screen instructions.
2.2 Claim TBA test tokens
Some features depend on testnet assets. Use Wallet Playground (Staging) to fund the wallet you will use.
- Use DID Wallet with an account created or imported (preferably the same identity you will use for Blocklet login).
- Open https://playground.staging.arcblock.io/
- The page explains the main token TBA and secondary PLAY3, etc.; follow the prompts.
- Click “Get Random TBA” (or the equivalent button) to top up for testing.

Wording may change slightly; the goal is to fund the wallet with TBA test tokens.
2.3 Local setup: Node, Blocklet CLI, and Blocklet Server
The steps below are typical on macOS / Linux; on Windows use WSL or follow official docs.
(1) Install nvm and Node.js 24
Node.js 24 is recommended (matches common setups for @blocklet/cli and local Blocklet Server). After install, node -v should show v24.x.x.
# Install nvm (if missing—see nvm official docs)
curl -o- https://raw.githubusercontent.com/nvm-sh/nvm/v0.39.7/install.sh | bash
# After adding nvm to ~/.zshrc or ~/.bashrc:
source ~/.zshrc   # or source ~/.bashrc

nvm install 24
nvm alias default 24
node -v   # expect v24.x.x
If you use fnm, asdf, or official installers, ensure node -v is 24.x.
(2) Install pnpm (optional, only if you run pnpm dev from the GLofter repo)
npm install -g pnpm
(3) Install Blocklet CLI globally
npm install -g @blocklet/cli
blocklet --version
(4) Install nginx (required)
Blocklet Server relies on nginx for routing. Install it before starting the server.
# macOS (Homebrew)
brew install nginx

# Ubuntu / Debian
sudo apt update
sudo apt install -y nginx
Check the version:
nginx -v
(5) Initialize and start Blocklet Server
Blocklet Server is the local runtime that installs, runs, and manages Blocklets.
From your home directory (run init once, then mostly start):
cd ~
blocklet server init --yes    # first time only
blocklet server start
Open the Blocklet Server admin UI in the browser as prompted, and complete admin login with DID Wallet (first-run flow depends on your Blocklet Server version).
3. Add the test store and install GLofter
Test builds are published on the Blocklet test store. Add that store URL in the admin UI and select it.
3.1 Add the “test store” URL
- Sign in to Blocklet Server admin.
- Open Store in the sidebar.
- Use the Store dropdown at the top, or “Choose app store URL” (or similar).
- If the test store is missing, choose “+ Add app store URL” and enter: https://test.store.blocklet.dev
- Save, then select Test Store as the source.
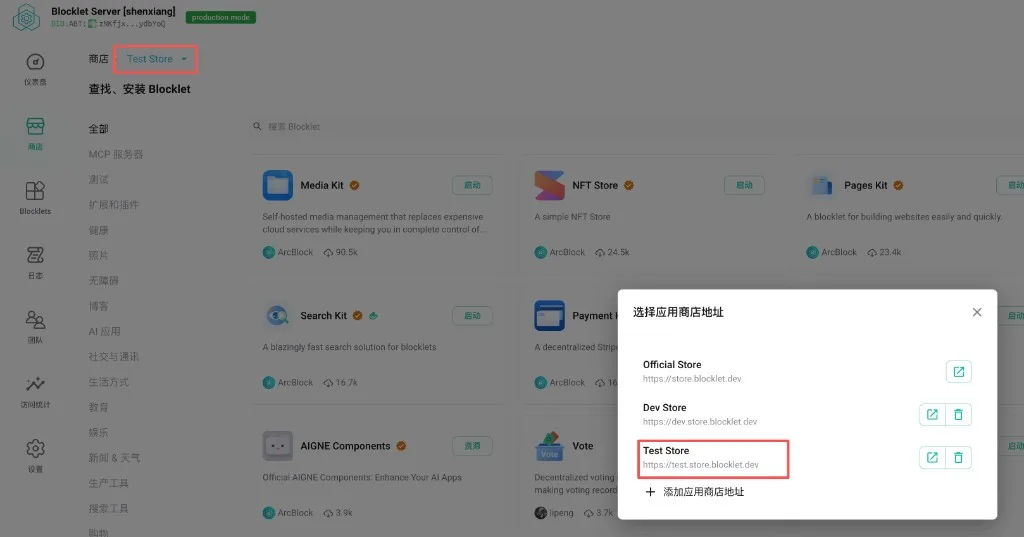
(UI may differ slightly; the store base URL must be the one above.)
3.2 Search for and install GLofter Studio and Hub
With the test store selected:
- Use Search; try keywords:
glofter,GLofter,studio,hub. - Install (or enable / start):
- GLofter Studio (package name often
glofter-studio) - GLofter Hub (package name often
glofter-hub)
You need both Blocklets for the full “studio + hub” experience.
3.3 Recommended first-time configuration (important)
After each Blocklet is installed, enable DID Wallet login:
Example path:
Blocklets → open the Blocklet → Configuration → Login → Login Methods → Add → DID Wallet
Beta testing assumes wallet login; Email etc. can be optional extras.
For admin / owner features, use Team (or equivalent) to issue a passport / adjust roles (e.g. admin, owner) per current Blocklet Server UI.
4. Basic usage once the environment is ready
4.1 Open Studio and Hub
In Blocklets, open each app’s URL (or “Open in browser”) for GLofter Studio and GLofter Hub.
- Studio: public site; admin is usually
/manage(in-app nav is authoritative). - Hub: aggregation and join flows; use with Studio to test “join Hub, agreements, sync,” etc.
4.2 Suggested smoke-test order
- Anonymous: browse Studio public home and albums without signing in.
- DID Wallet login: sign in on Studio (or Hub) and confirm no callback errors.
- Admin: after login, open Manage and check dashboard, albums, services, etc. (if access is wrong, see §3.3 for roles).
- Hub integration (if in scope): studio list or join entry on Hub; Hub-related settings or request status on Studio (depends on current build).
4.3 Optional: run from source (developers only)
If you cloned the GLofter repo, from the repo root (with pnpm installed):
nvm use 24
pnpm -w install
pnpm --filter studio dev    # often port 3001
pnpm --filter hub dev       # often port 3002
This is separate from installing via Blocklet Server; end users usually only need Blocklet Server + store install.
5. FAQ and tips
| Symptom | What to try |
|---|---|
| Login fails, DID callback errors | Ensure DID Wallet is added under Login Methods; don’t block DID-related domains. |
| On-chain action fails | Confirm TBA was claimed in Playground; wallet network matches the page. |
| Store search finds no glofter | Confirm test.store.blocklet.dev is selected; refresh or search GLofter Studio / GLofter Hub. |
| Node version issues | Prefer Node 24; node -v should be v24.x.x. |
blocklet server errors | Run init from home directory; only one Server instance; check CLI and logs. |
| Other environment issues | Send full terminal output and screenshots to whoever invited you, with Blocklet / Node versions. |
6. Feedback
For beta feedback, please note:
- Browser and OS version
- Steps to reproduce and screenshots
- Approximate Blocklet Server / Studio / Hub version or install time
Share with the person or team who invited you.
You can also file bugs and discuss in the ArcBlock community:
Note: Store URLs, Playground links, and admin menu labels follow current ArcBlock / Blocklet products; if they differ from screenshots, trust the live UI.
5 replies
社区奖励应该发给你这样的开发者
之前都是些什么歪瓜裂枣
能不能搞个onlyfans
去中心化相册可以搞
去中心化云盘就肯定火,百度云刚上市几年到处分享秒互存日本动作片,用户爆发以后就禁了